Using LoRAs in Scope
LoRA (Low-Rank Adaptation) adapters let you customize the concepts and styles used in your generations. You can install LoRAs from HuggingFace or CivitAI directly from the app, load one or multiple at a time, and adjust their scale in real-time.Pipeline compatibility
Different pipelines support different LoRA model types. Make sure you download LoRAs that match your pipeline:Krea Realtime uses the larger 14B model, so it requires different LoRAs than the other Wan2.1 pipelines.
Recommended LoRAs
Here are some LoRAs to get you started:For 1.3B pipelines (StreamDiffusion V2, LongLive, RewardForcing, MemFlow)
Arcane Jinx
Character LoRA for the Arcane art style
Genshin TCG
Stylized trading card game aesthetic
For 14B pipeline (Krea Realtime)
Origami
Paper-craft folded aesthetic
Film Noir
Classic black-and-white cinema style
Pixar
3D animated movie aesthetic
Installing LoRAs
Scope has a built-in LoRA installer. You paste a URL from HuggingFace or CivitAI and the app downloads the file for you. This works for both local and Remote Inference sessions.Paste the URL
Copy the URL of a
.safetensors file from HuggingFace or a LoRA model page from CivitAI. Paste it into the URL input field.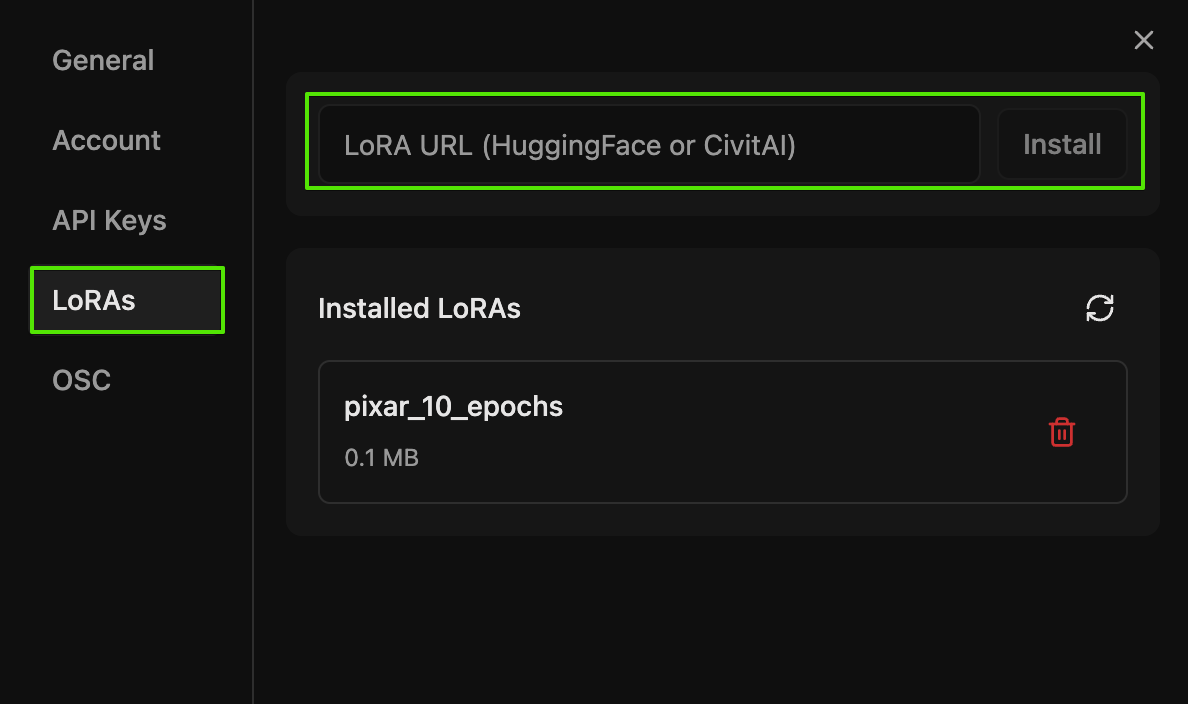
Managing installed LoRAs
The Installed LoRAs section in the LoRAs tab shows all your downloaded LoRA files with their file sizes. From here you can:- Delete a LoRA by clicking the trash icon next to it
- Refresh the list with the refresh button if you added files manually
~/.daydream-scope/models/lora/ and grouped by folder in the list.
Installing via terminal (RunPod)
Installing via terminal (RunPod)
If you have terminal access to a GPU machine (for example on RunPod), you can also download LoRAs manually using Example:Example:
wget.From HuggingFace
On the LoRA page, go to Files and versions and copy the link address for the.safetensors file.Then download it to the LoRA folder:From CivitAI
CivitAI requires an API key for programmatic downloads.- Create an account at civitai.com
- Go to Developer Settings
- Generate an API key
Configuring LoRAs
Once you have LoRAs installed, you can add them to your pipeline from the main interface. The LoRA Adapters dropdown shows LoRAs that have been installed through Settings or added manually to the~/.daydream-scope/models/lora/ folder.
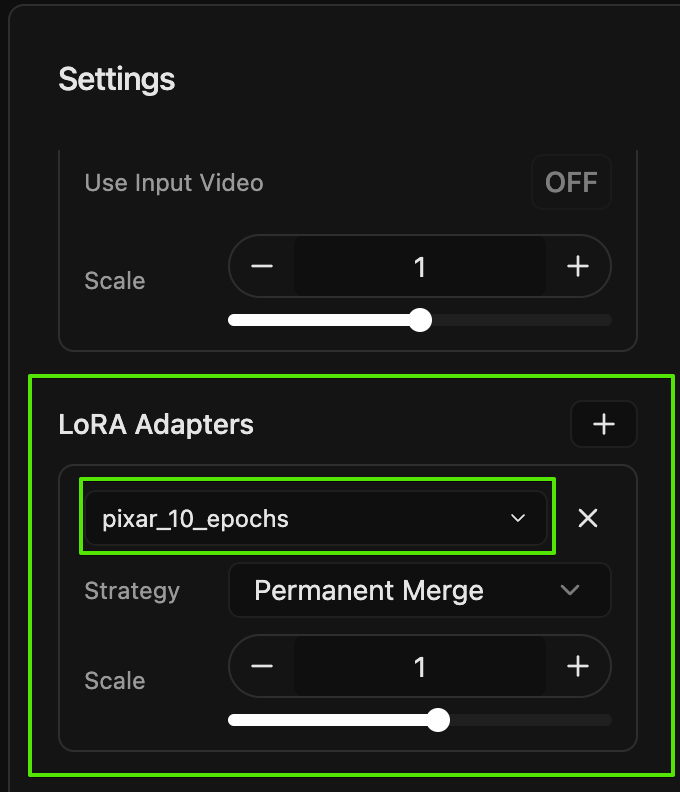
Open the LoRA Adapters section
In the main Scope interface, find the LoRA Adapters section below the pipeline settings. If you don’t see it, make sure your selected pipeline supports LoRAs (see the compatibility table above).
Add a LoRA
Click the + button to add a new LoRA slot. A dropdown will appear showing all your installed LoRA files. Select the one you want to use.
Choose a merge strategy
Each LoRA has a Strategy dropdown with two options:
| Strategy | Best for | Trade-off |
|---|---|---|
| Permanent merge | Maximum FPS during generation | Scale is fixed at pipeline load and cannot be changed while streaming |
| Runtime PEFT | Real-time tweaking during generation | Scale adjustable at any time, but up to ~50% FPS overhead |
You cannot add, remove, or switch LoRAs while a stream is running. Stop the generation first, make your changes, then press Play again. If you’re using the Runtime PEFT strategy, you can adjust the scale slider while streaming.
Try community examples
Want to see LoRAs in action? Check out this walkthrough from the Community Hub:From Photorealistic to Pixar in Real-Time
Watch how a single LoRA transforms a puppy scene from photorealistic to Pixar animation style using the Krea Realtime pipeline, with downloadable timeline files
Remote inference
LoRAs are fully supported with Remote Inference. When you install a LoRA while connected to a remote session, the file downloads directly to the cloud machine. Everything else works the same as local, including multiple LoRAs, scale adjustments, and merge strategies.Remote Inference
Learn how to run Scope on cloud-hosted GPUs without local hardware
See also
Quick Start
Get Scope running if you haven’t already
VACE Guide
Use reference images to guide your generations