Controlling Scope and visual software over OSC
You want to control Daydream Scope and a second application (Resolume, TouchDesigner, or something else) from the same OSC source. Or maybe you want one app to control the other over OSC. Unlike MIDI, OSC is network-based and doesn’t have the exclusive-device problem. But it has its own routing considerations, and the setup is different enough to warrant its own guide.Why OSC Instead of MIDI?
Both protocols map physical controls to software parameters, but they work differently under the hood.
OSC gives you smoother fades, more granular control, and no device-exclusivity problems. The tradeoff is more explicit configuration.
What You’ll Need
- Daydream Scope installed and running (with OSC enabled)
- A second application: Resolume Arena/Avenue, TouchDesigner, or similar
- An OSC source: a tablet/phone app (TouchOSC, OSC/PILOT, Lemur), another piece of software, or a MIDI controller with an OSC bridge
- All devices on the same local network (or running on the same machine using
localhost)
How OSC Routing Works
Each application listens for OSC messages on a specific UDP port on a specific network address (localhost / 127.0.0.1 if everything is on the same machine, or a LAN IP if across machines). No two applications can listen on the same port on the same machine; they each need their own.
Step 1: Enable OSC in Scope
Scope’s OSC server is always on. It shares a UDP socket with the HTTP API on the same port — default8000 — so as soon as Scope is running, OSC is reachable.
1
Open OSC settings
Open Scope and go to Settings → OSC. You’ll see the listening host, port, and a live list of every exposed OSC path.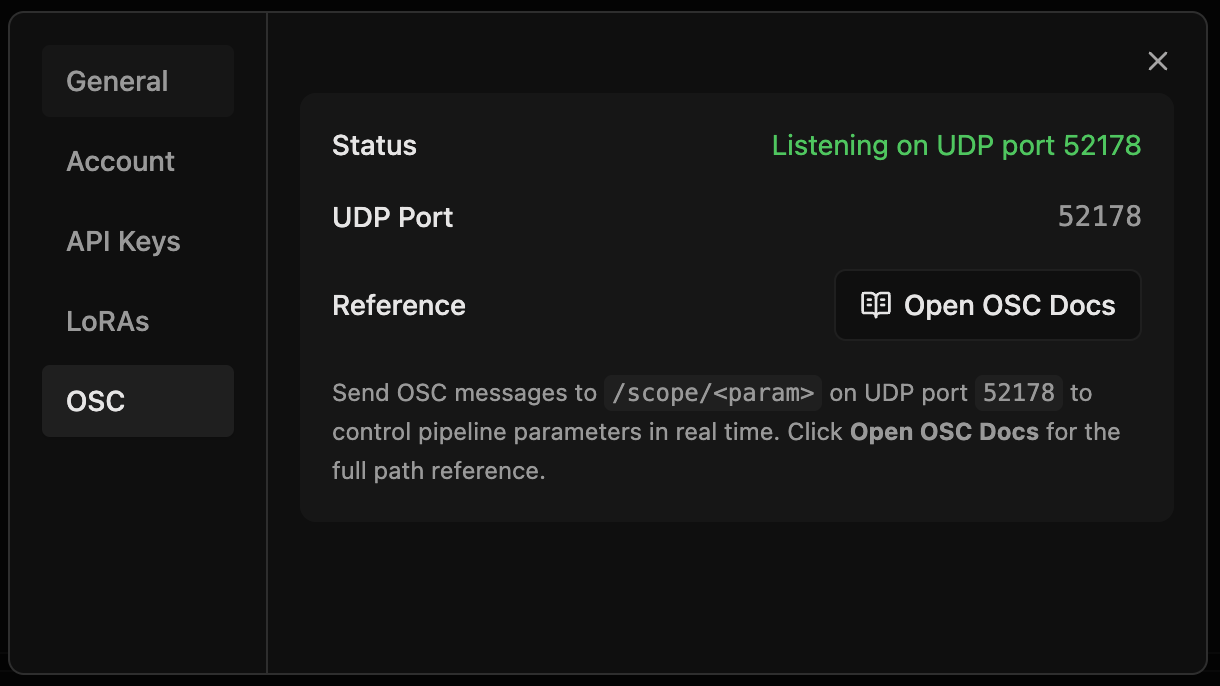
2
Confirm the port
The default port is
8000. To override it, set the SCOPE_PORT environment variable before launching Scope. UDP and HTTP coexist on the same port, so changing one changes both.3
Open the live OSC reference
Click Open OSC Docs (or visit 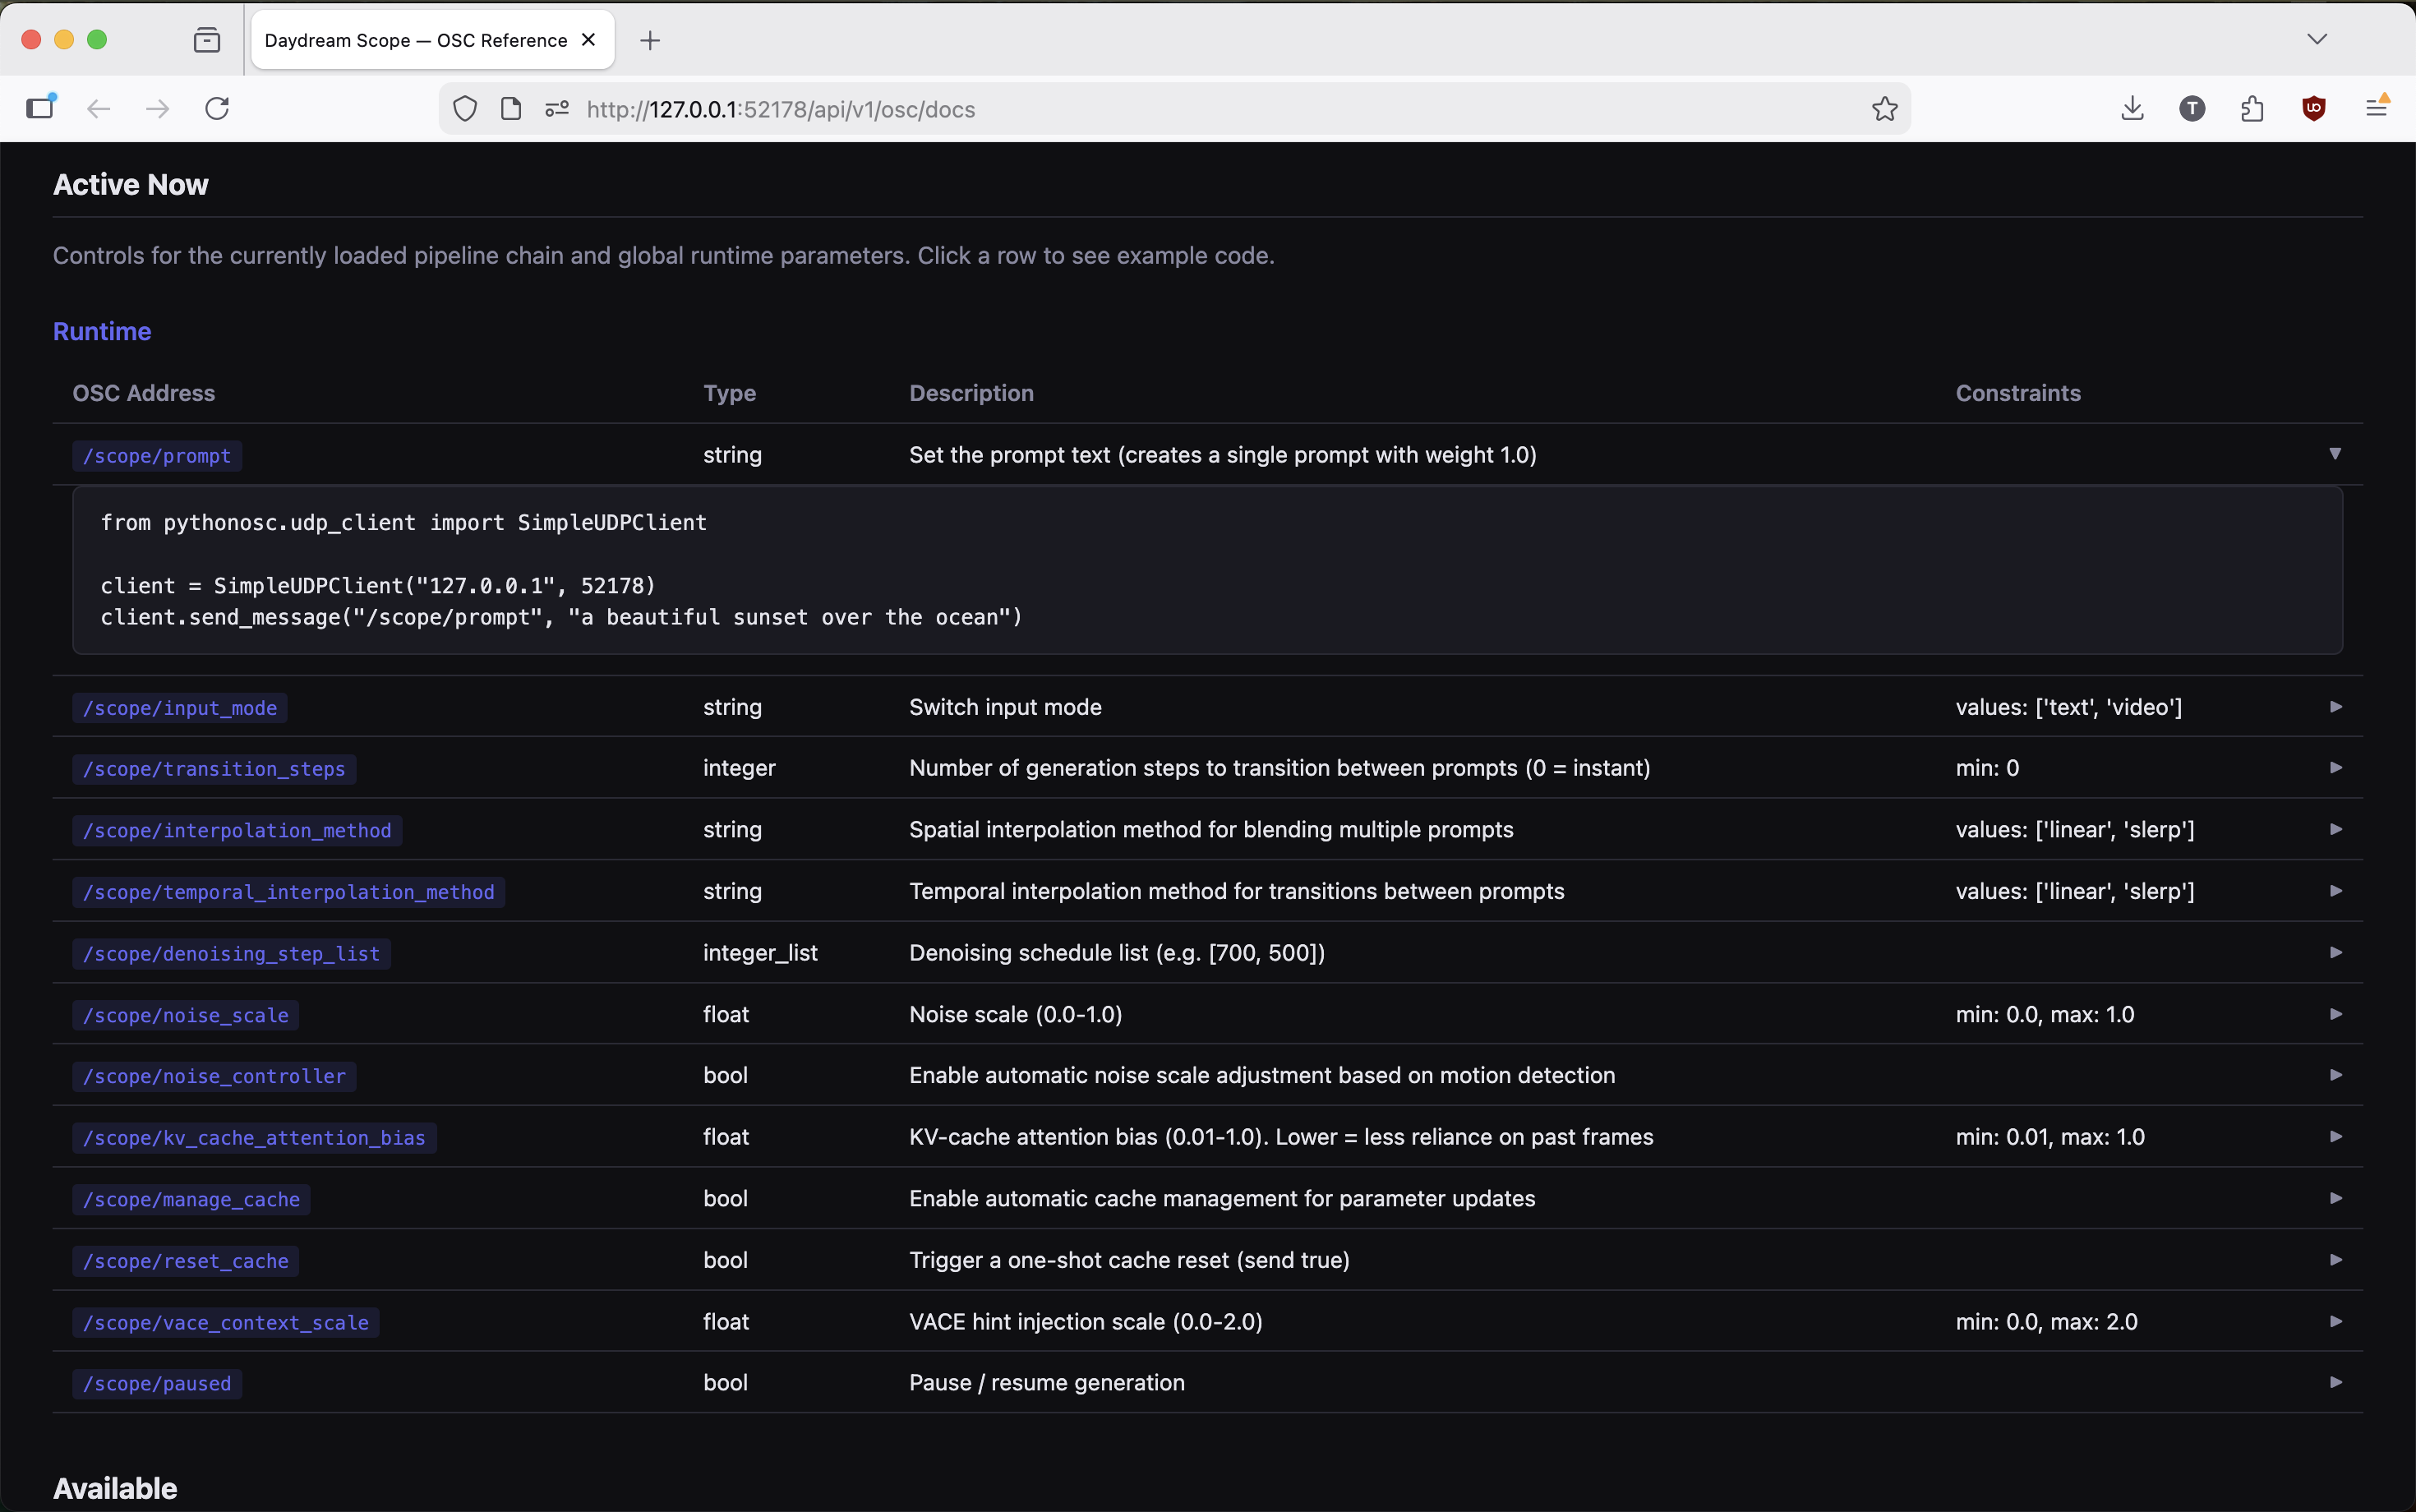
http://localhost:8000/api/v1/osc/docs) for an auto-generated reference page. Every path lists its address, type, range/enum constraints, default value, and a one-click Python snippet you can paste into TouchDesigner’s text DAT.4
(Optional) Toggle message logging
Enable Settings → OSC → Log Messages to see every received message — valid and invalid — in the Scope logs. Useful when debugging address typos or type mismatches.
What’s reachable via OSC
Scope publishes three layers of OSC paths:
The graph-node layer is the new piece — sliders, XY pads, triggers, and the Source/Output nodes are now drivable over OSC, not just pipeline parameters.
Step 2: Configure OSC per Node
Most graph nodes don’t expose anything over OSC until you opt them in. The setup lives in the graph editor’s right-click menu.1
Open Configure OSC…
Right-click any node in the graph editor and pick Configure OSC…. The modal lists every OSC-eligible parameter for that node type.
2
Tick Expose
Each row has an Expose checkbox. Tick it to publish that param’s address. Pipeline-runtime params are already exposed at their legacy flat address (
/scope/prompt, /scope/noise_scale, …) until you customize anything on that pipeline node.3
Edit the address (optional)
The Address column auto-fills as
/scope/<node-slug>/<param> (the slug is the node’s display title in kebab-case). Override it to match an existing OSC layout — e.g. /scope/tempo, /scope/main/prompt, or any address your controller already sends.4
Set a default (optional)
The Default column is advisory metadata that Scope publishes in the OSC docs so external clients can mirror the starting state. It does not auto-apply on session start; defaults to the node’s current value.
5
Save
Hit Save. The graph re-publishes its OSC inventory to the backend within ~300ms and the new address is reachable immediately. The
oscConfig is stored on the node and round-trips with graph save/export/import.What you can expose, by node type
Composite-shape params (knob arrays, MIDI channel arrays, tuple values) aren’t exposed yet — they need a richer addressing scheme.
Address format
Backwards compatibility
Pipeline runtime params keep their flat address/scope/<param> until you open Configure OSC on the pipeline node and save any change. Existing rigs sending /scope/prompt, /scope/noise_scale, /scope/paused, etc. continue to work without graph-side configuration. The moment you opt a pipeline param in (or out) explicitly, the legacy flat alias is replaced by the namespaced address you chose — which is what lets you drive two pipeline instances independently when they share param names.
Step 3: Discover Available Paths
Three ways to see what’s reachable right now:- In-app: Settings → OSC has a “Currently exposed paths” panel. Each row is click-to-copy.
- HTML reference:
http://localhost:8000/api/v1/osc/docs— auto-generated table with addresses, types, ranges, defaults, and Python snippets. - Programmatic:
curl -s http://localhost:8000/api/v1/osc/paths | jqreturns the JSON inventory, grouped intoactive(reachable now) andavailable(registered but not loaded yet).
Step 4: Configure OSC in Your Second Application
Resolume Arena/Avenue
1
Open OSC preferences
Open Preferences → OSC. Note the Input Port (default is usually 7000).
2
Enable OSC input
Enable OSC input. This is the port your OSC source needs to target for Resolume.
3
Map parameters
To map a custom parameter: open the Shortcuts panel, select OSC as the protocol, click the parameter you want to map, then send an OSC message from your source. Resolume learns the address and binds it.
/composition/layers/{layer}/clips/{clip}/connect for triggering clips, /composition/layers/{layer}/video/opacity for layer opacity, and so on. Resolume can also send OSC for feedback to your controller or to drive another app.
TouchDesigner
For TouchDesigner receiving OSC (e.g. from a controller):1
Create an OSC In CHOP
Create an OSC In CHOP in your network.
2
Set the network port
Set the Network Port to TouchDesigner’s listening port (e.g., 7000 — anything not already in use). Don’t use Scope’s port (
8000); two apps can’t listen on the same port on the same machine.3
Use the data
Incoming OSC messages appear as CHOP channels. Each unique address path becomes its own channel. Export channels to operator parameters (right-click → Export), or reference them with expressions like
op('oscinchop1')['address/path'].- Create an OSC Out CHOP (or OSC Out DAT for strings).
- Set the Network Address to
127.0.0.1for same machine, or Scope’s LAN IP across machines. - Set the Network Port to
8000(or whateverSCOPE_PORTyou configured). - Add a channel named after the address you want to drive —
/scope/prompt,/scope/noise_scale,/scope/tempo/value, etc. - Animate or bind the channel value to your TD parameters.
Step 5: Configure Your OSC Source
Tablet/Phone Apps (TouchOSC, OSC/PILOT, Lemur)
These apps let you define multiple output targets. Add one target per application:- Target 1: Scope’s IP and port (e.g.,
192.168.1.100:8000orlocalhost:8000) - Target 2: Resolume’s IP and port (e.g.,
192.168.1.100:7000)
Another Application (e.g., TouchDesigner → Scope)
- Create an OSC Out CHOP for each destination (or use a single OSC Out DAT with scripted message sending)
- Set each one’s network address and port to the corresponding target app
- Wire your MIDI In CHOP (or any other data source) through any processing you need, then into the OSC Out
MIDI Controller via Bridge
If you have a physical MIDI controller and want to convert its output to OSC:- OSC/PILOT can receive MIDI and send OSC simultaneously
- Open Stage Control is a free, open-source option with MIDI-to-OSC bridging
- TouchDesigner itself is an excellent bridge: MIDI In CHOP → any processing → OSC Out CHOP
- A lightweight Python script using
mido(MIDI) andpython-osc(OSC) can do this in about 20 lines
Step 6: Plan Your Address Space
Unlike MIDI (where you’re mostly dealing with CC numbers 0–127 on channels 1–16), OSC gives you arbitrary string-based addressing. This is more powerful but requires some coordination.OSC addresses are case-sensitive and must match exactly. A typo in an address path is the most common reason messages arrive but don’t affect parameters.
- Use each app’s native OSC addresses where possible (Resolume and TouchDesigner both document theirs)
- For Scope, use the addresses listed at
http://localhost:8000/api/v1/osc/docs— and override per-node addresses in Configure OSC… to match an existing layout instead of renaming controls on your tablet - If you’re building custom controls, namespace them:
/scope/prompt_strength,/resolume/layer1/opacity, etc. - If the same control should affect both apps, send the same message to both ports (your OSC source handles the fan-out)
Validation
Scope validates every incoming message against the path’s type and range before broadcasting. Invalid messages are logged but never reach the pipeline.
Out-of-range numeric values are rejected with
"value X below minimum Y" / "above maximum Y". Enum-violating strings get "value 'foo' not in allowed values […]". Toggle Settings → OSC → Log Messages to see all messages (valid + invalid) in the Scope logs.
Step 7: Connect the Video Pipeline
Same as the MIDI guide: Scope outputs video via Spout (Windows), Syphon (macOS), or NDI (network). This is independent of your control protocol.- Same machine: Spout or Syphon. Sources appear automatically in Resolume and TouchDesigner
- Across machines: NDI. Sources appear automatically on the same network
Routing OSC to Multiple Apps from a Single-Target Source
If your OSC source only supports one output target, you need a relay to fan out the messages:- TouchDesigner: Set it as the sole OSC target, then use multiple OSC Out CHOPs to forward messages to each destination app. This also lets you filter or transform messages per-destination
- Open Stage Control: Acts as a relay with customizable routing rules
- oscrouter / osc-splitter utilities: Small standalone tools that listen on one port and forward to multiple destinations
- Custom script: A Python script with
python-osccan listen on one port and forward every message to N destinations in about 15 lines
Troubleshooting
No OSC arriving in an app
No OSC arriving in an app
Check that the target port matches the app’s listening port. Verify the app is actually listening (Scope: hit
http://localhost:8000/api/v1/osc/status; TouchDesigner: check the OSC In CHOP’s node viewer; Resolume: check the MIDI/OSC monitor in preferences). Make sure your firewall isn’t blocking UDP on that port.Port conflict (app won't start OSC)
Port conflict (app won't start OSC)
Two apps can’t listen on the same port. Give each app its own port and configure your source accordingly. For Scope, set
SCOPE_PORT before launching to move both UDP and HTTP off the default 8000.Messages arriving but not affecting parameters
Messages arriving but not affecting parameters
The address path probably doesn’t match what’s exposed. OSC addresses are case-sensitive and must match exactly. Check
http://localhost:8000/api/v1/osc/docs for the live list of Scope addresses, and turn on Settings → OSC → Log Messages to see exactly what’s arriving — Scope logs both valid messages and rejection reasons (type mismatch, out-of-range, unknown address).Works on same machine, fails across network
Works on same machine, fails across network
Verify both machines are on the same subnet. Replace
localhost / 127.0.0.1 with the target machine’s actual LAN IP. Check firewalls on both ends.Jitter or dropped messages
Jitter or dropped messages
OSC over UDP doesn’t guarantee delivery. On a clean local network this is rarely an issue, but WiFi can introduce drops. If you’re controlling from a tablet over WiFi and seeing inconsistency, try a wired connection or reduce your message rate.
The General Pattern
The architecture for multi-app OSC control:- Each app gets its own UDP port on the network. No sharing, no conflicts
- Your OSC source sends to multiple targets (most controller apps support this natively)
- Address paths are per-app — coordinate your namespace so messages go where you intend
- Use a relay (TouchDesigner, Open Stage Control, or a script) when your source only supports one target, or when you need to transform messages per-destination
- Video pipeline (Spout/Syphon/NDI) is separate from the control protocol and works the same regardless of whether you’re using MIDI, OSC, or both
See Also
Using MIDI
Control Scope and other visual software from a single MIDI controller
Using DMX
Control Scope from lighting consoles via Art-Net DMX
Using Spout
Share real-time video between Scope and other applications on Windows